Unplug it, let it cool, clean blades, lighten load, check motor parts.
If your kitchen smells like hot plastic after a smoothie, you’re in the right place. I’ve fixed many blenders for homes and cafés. This guide gives a clear blender burning smell fix you can trust. We’ll diagnose fast, solve root causes, and prevent repeats with easy steps. By the end, you’ll know the exact blender burning smell fix that fits your model and your use case.

Source: lifeboostcoffee.com
What causes a burning smell in a blender?
A burning smell means heat and friction. It often points to overload, blockage, or wear. In most home blenders, a universal motor spins fast. If the motor faces too much resistance, it runs hot and can smell.
The smell can come from several spots. It may be the motor windings, the drive coupling, the jar gasket, or carbon brushes. Food stuck near vents can bake and smell like burnt toast. A new unit may smell a bit at first use, but that should fade fast. If it does not, you need a blender burning smell fix now.
Is a new blender smell normal? It can be mild and brief during the first few runs. But a sharp, strong, or plastic melting odor is not normal. Stop and check.
Source: blenders24.best
Safety first: when to stop and how to test
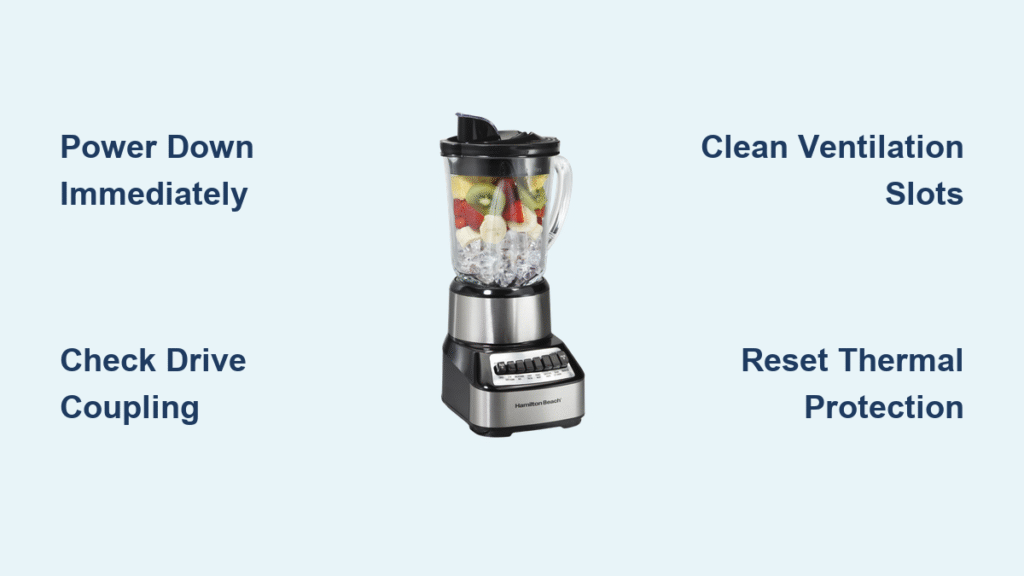
If you smell sharp burning, stop use at once. Unplug the blender. Let it cool for at least 30 minutes. Safety matters.
Look for smoke, melted plastic, or scorch marks. Check the outlet and plug for heat. If the cord feels hot or looks damaged, do not use it again. The right blender burning smell fix starts with a calm, safe check.
Do a low-risk test after cooling. Add a cup of water and a drop of dish soap. Pulse for three seconds. If the smell returns fast, you have a deeper issue.

Source: youtube.com
The quick blender burning smell fix checklist
Use this short path to a fast win. These steps solve most cases I see.
- Unplug and cool. Heat builds fast. Give it time to reset.
- Clean the jar, blades, and base. Remove stuck food. Check the gasket.
- Lighten the load. Use smaller batches. Add more liquid for thick blends.
- Pulse, don’t push. Short bursts reduce heat and strain.
- Vent the motor. Clear dust from vents with a soft brush or low air.
- Check blade spin by hand. It should turn smooth with the jar off the base.
- Inspect the drive coupling. Look for cracks, melt, or rubber dust.
- Test with water only. If smell is gone, food load caused it.
- Lubricate the jar bearing only if the maker allows it. Many do not. Follow your manual.
- Let the thermal protector reset. Some models need a full cool-down.
If the smell fades after these, you found your blender burning smell fix. If not, move to the deeper steps below.

Source: blenders24.best
Deep fixes by cause
Overload and poor airflow
Thick blends like nut butter strain motors. Long blend times trap heat. Vents blocked by towels or crumbs make it worse. The fix is simple. Reduce batch size, add liquid, and blend in short bursts. Keep vents clear and the base dry.
Dull or bent blades
Dull blades do not cut. They churn. That raises heat and stress. Check edges under light. If they look rolled or nicked, replace the blade assembly. Most makers sell jar lids with blades as one unit for safety.
Worn drive coupling or socket
Many blenders use a rubber or plastic coupling. It links the motor to the blade. When worn, it slips. Slips make heat and that hot rubber smell. Look for cracks, shiny spots, or rubber dust. Replace the coupling per your manual. It is often a quick blender burning smell fix.
Carbon brushes nearing end of life
Universal motors use carbon brushes. As they wear, you can smell an acrid odor. You may see sparks through the vents. The motor may sound harsh. Brushes are cheap and simple to replace on many models. If under warranty, ask support first.
Food debris in vents or under the jar
Sugar, flour, or spices can get into vents. They bake and smell burnt. Use a soft brush to clean vents. Do not spray cleaner into the base. Lift the base feet if they are removable. Wipe dust and crumbs.
Jar misalignment or bad gasket
If the jar is not seated right, the drive binds. A torn gasket can leak. Leaks wash food into the base. Check the jar sits flat. Replace worn gaskets. This small blender burning smell fix prevents big repairs.
Electrical issues
A frayed cord, a loose switch, or melted insulation can smell sharp. Do not open sealed units unless you are trained. If you see burn marks, seek a pro. This is not a DIY fix.
Can you run a blender without the lid to cool it? Do not. It is unsafe and messy. Use proper airflow, not open tops.

Source: youtube.com
Prevent it: care and maintenance that work
Small habits prevent big smells. Use these proven tips.
- Pre-cut tough items into smaller chunks.
- Add liquid first, then solids. Start slow, then increase speed.
- Stop and scrape the sides. Give the motor small rests.
- Clean after each use. Remove the jar, blade, and gasket as your manual allows.
- Store the base in a dry, dust-free spot.
- Keep vents clear at all times.
These steps are a strong blender burning smell fix on their own. They target the root cause: heat and friction.

Source: youtube.com
Repair or replace: making the smart call for a blender burning smell fix
Think about age, parts cost, and your use. If your blender is under warranty, contact support first. If the base motor smells even at no load, a repair can save the unit. Brushes and couplings are low-cost parts. Blade assemblies and jars cost more.
If the motor windings are burnt or the board is fried, a new blender may be cheaper. For daily heavy use, consider a pro-grade unit. It handles thick blends with less heat. That can be the most reliable blender burning smell fix long term.

Source: ifixit.com
Tools and supplies for DIY fixes
Keep a small kit on hand. It makes the job quick.
- Soft brush and microfiber cloth for vents and dust.
- Screwdrivers that fit your model’s fasteners.
- Replacement gasket, coupling, and brush kit if supported.
- Food-safe lubricant if your maker allows bearing lube.
- Compressed air at low pressure for careful cleaning.
With these, you can apply the right blender burning smell fix in minutes.

Source: lifeboostcoffee.com
Frequently Asked Questions of blender burning smell fix
Why does my blender smell like burning plastic?
It often means the drive coupling or gasket is melting under stress. Overload, misalignment, or long run times can cause heat buildup.
Is a faint burning smell normal in a new blender?
A mild, brief odor can happen during first runs. If it persists or gets stronger, stop and inspect parts.
Can a dull blade cause a burning smell?
Yes. Dull blades strain the motor and make heat. Replacing the blade assembly is an easy and effective fix.
How long should I let my blender cool?
Give it 20 to 30 minutes after a hot run. If it has a thermal protector, wait until it fully resets and the smell is gone.
What’s the quickest blender burning smell fix at home?
Unplug, cool, clean the jar and vents, reduce load, and pulse. If the smell returns with water only, parts likely need replacement.
Do I need to replace the drive coupling?
If it is cracked, shiny, or leaves rubber dust, yes. A new coupling restores grip and stops heat from slipping.
Is it safe to keep blending if the smell is mild?
No. Even a mild burning smell is a warning sign. Stop, inspect, and fix before further use.
Conclusion
A burning smell means your blender is working too hard or has worn parts. The fastest fix is simple: cool it, clean it, lighten the load, and check the coupling, blades, and vents. If the odor returns, replace the worn part or get a pro check.
Act now to protect your motor and your food. Try the steps today and lock in a lasting blender burning smell fix. If you found this helpful, subscribe for more kitchen repair guides or drop a comment with your model and issue.