Unplug, descale, clear clogs, reset, and check water flow and power.
If your morning brew stalls, I can help you bring it back. I’ve fixed dozens of stubborn machines at home and for friends. This guide breaks down every coffee maker not brewing fix, from quick checks to deeper repairs, in plain, practical steps you can trust.

Source: autoclima.com
Understand why a coffee maker stops brewing
A coffee maker brews by heating water, pushing it through a tube, and over coffee grounds. When that loop breaks, you get no flow, slow drips, or cold water. The main causes are clogs, scale, power faults, bad sensors, and worn pumps.
Most issues are simple. A stuck float in the tank can stop flow. A clogged spray head can block water. Scale can choke the heater and make the pump strain. The good news: a safe coffee maker not brewing fix often takes less than 20 minutes.

Source: youtube.com
Safety first and fast checks
Start with the basics. These quick checks solve many cases.
- Make sure the plug is secure. Test another outlet, or reset the GFCI.
- Confirm the water tank is full and seated. Check that the lid is closed.
- Re-seat the carafe. Many brewers have a pause-and-serve lever that must press down.
- Remove the paper filter and grounds, then try a water-only brew cycle.
- Check the clock, auto-off, and brew strength settings. Some models will not brew if set to delay.
- Power cycle the unit. Unplug for 5 minutes, then plug back in.
If it still will not brew, move to a deeper coffee maker not brewing fix below.

Source: asheborolawfirm.com
A step-by-step coffee maker not brewing fix for drip machines
These steps cover most basket-style brewers from brands like Mr. Coffee, Cuisinart, Hamilton Beach, and Braun.
Clear the basket and spray head
- Lift out the filter basket and rinse it. Remove any grounds stuck in the side slots.
- Clean the spray head or drip disk. Use a soft brush or a toothpick to clear each hole.
Why it works: fine grounds pack into vents and block the path. I learned this the hard way after a messy overflow during a brunch rush.
Descale the machine
- Mix a descaler: use white vinegar and water at 1:1, or 2 tablespoons citric acid per quart of water.
- Fill the reservoir with the mix. Start a brew cycle. Halfway through, stop the cycle and let it sit for 20 minutes.
- Finish the cycle. Then run two to three full tanks of fresh water to rinse.
Tip: If your water is very hard, repeat once more. A clean heater restores flow, heat, and taste. Many manuals advise a descale every 1 to 3 months.
Prime the water path
- If the pump hums but no water moves, prime it. Fill the tank, then use a turkey baster to push a bit of water into the intake port.
- Start a brew cycle. Repeat once if needed.
This simple coffee maker not brewing fix has saved a few “dead” units for me after long storage.
Check the carafe sensor and pause valve
- Look under the basket for a spring-loaded valve. Make sure it moves freely.
- Press the carafe against the switch area to confirm contact.
A stuck valve blocks the drip path. A quick clean often restores the seal.
Replace the water filter
- If your model has a charcoal filter, swap it. Old filters shed carbon dust and slow flow.
Use these steps in order. Many readers find that a clean and descale are the only coffee maker not brewing fix they need.

Source: youtube.com
Coffee maker not brewing fix for Keurig and other single-serve pod machines
Pod brewers add a few extra choke points. Here is how to get them flowing again.
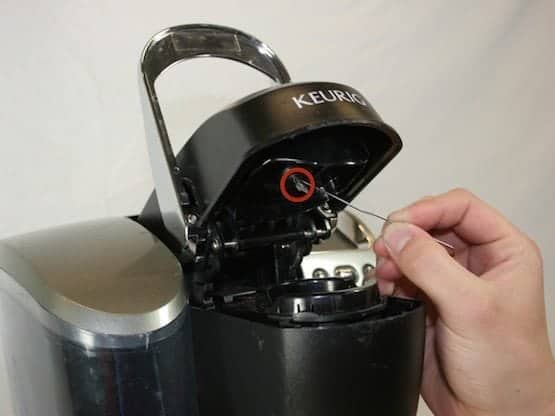
Unclog the needles
- Unplug. Remove the pod holder.
- Use a straightened paperclip to gently clear the top and bottom needles. Insert only a few millimeters.
- Rinse the holder well.
Grounds and sticky syrups love to live here. This is my most common Keurig repair for friends.
Descale with the built-in mode
- Fill the tank with descaler or a water-vinegar mix.
- Run the descale program if your model has it. If not, brew several cup cycles without a pod.
- Rinse with two full tanks of fresh water.
Free a stuck float
- Look at the water tank magnet float. If it is stuck low, the machine thinks the tank is empty.
- Tap the tank or soak it in warm, soapy water. Rinse and try again.
Reseat and reset
- Seat the tank, pod holder, and drip tray well.
- Try a factory reset if your model supports it. Then run a plain water cycle.
These give you a reliable coffee maker not brewing fix on most single-serve models, fast.

Source: youtube.com
Water quality, scale, and why it matters
Hard water leaves limescale. Scale coats the heater, narrows tubes, and slows heat transfer. Pumps then run loud, flow drops, and brewing stops. That is the root cause in many coffee maker not brewing fix cases.
- Use filtered water if your tap water is hard.
- Test with simple strips. If hardness is high, descale monthly.
- Vinegar works and is cheap. Citric acid leaves less smell and is gentle on metals.
Note: Some aluminum boilers react to strong acid if left to soak too long. Do not leave descaler in a machine overnight.
Source: spanr.ai
Pumps, heaters, and sensors: deeper diagnostics
If the steps above fail, you may have a part issue. Proceed with care.
- No heat and cold water often means a tripped thermostat or bad heater.
- Heat is fine but no flow points to a seized pump or blocked check valve.
- Intermittent shutoffs can be a failing thermal fuse or a loose wire.
Safe steps:
- Unplug the unit. Let it cool.
- If still in warranty, do not open the case. Contact support.
- Out of warranty and skilled with tools? You can test continuity on the heater, thermostat, and fuse with a meter. Replace like for like. Use heat-rated parts only.
I have replaced a thermal fuse on a 10-year-old drip brewer. It worked, but the plastic was brittle. In that case, a new brewer was the smarter long-term call. Be honest about time, safety, and cost on any coffee maker not brewing fix at this level.

Source: youtube.com
Prevention plan to keep your brewer trouble-free
A small habit beats a big repair. This simple routine saves your mornings.
Daily
- Empty grounds and rinse the basket and carafe.
- Run a short water-only brew if you used flavored coffee or syrups.
Weekly
- Wash the tank, lid, and drip tray with warm, soapy water.
- Wipe the spray head and the area under the basket.
Monthly
- Descale on a set day. Add a calendar reminder.
- Replace charcoal filters as directed.
Brewing best practices
- Use the right filter and grind size. Too fine will choke the basket.
- Do not overfill the basket. Follow the max line.
This is the easiest coffee maker not brewing fix strategy of all: prevent the problem.
Source: ambassadoradvertising.com
Repair or replace: how to decide
Know when to stop chasing a fault.
- Age and cost: if the unit is over 5 years old and parts cost more than half of a new model, replacement is wise.
- Safety: cracked tanks, melted cords, or scorched smells mean retire now.
- Use case: if you brew daily, a new, efficient model can save time and power.
I love a good repair win. But I also value safe, steady mornings. Choose the coffee maker not brewing fix that gives you both.
Tools and supplies you may need
Keep a small brew repair kit on hand.
- White vinegar or citric acid
- Paperclip or soft needle-cleaning tool
- Soft brush and microfiber cloth
- Turkey baster for priming
- Food-safe descaling solution
- Replacement charcoal filters
- Screwdriver set and a basic multimeter (for out-of-warranty checks)
This kit covers almost every home coffee maker not brewing fix you will face.
Common mistakes to avoid
Learn from common slip-ups I see a lot.
- Skipping the rinse after descaling. Always run clean water until the smell is gone.
- Poking needles too hard. Go gentle to avoid bending or breaking sharp parts.
- Leaving wet grounds in the basket. This invites mold and clogs.
- Using very fine espresso grind in a drip machine. It blocks flow.
- Ignoring the water float. A stuck float mimics an empty tank and stops brewing.
Avoid these and most coffee maker not brewing fix tasks stay quick and clean.
Frequently Asked Questions of coffee maker not brewing fix
Why does my coffee maker make noise but not brew?
The pump likely runs but a clog stops flow. Descale the machine and clear the spray head or pod needles to restore movement.
Can vinegar damage my coffee maker?
Vinegar is safe when diluted and rinsed well. Do not leave it sitting for hours, and always run fresh water cycles after.
How often should I descale?
It depends on water hardness and use. Most homes need a descale every 1 to 3 months for a stable brew and faster heat-up.
What if my GFCI outlet trips when I brew?
A tripping GFCI may point to a leak or a failing heater. Try another outlet to test, but stop use and contact support if trips continue.
Why is my coffee weak after I fixed the clog?
Scale or a partial block can reduce brew temperature and time. After a full descale and rinse, use fresh grounds and the right grind size.
My Keurig says “add water” but the tank is full. What now?
The tank float may be stuck or the magnet misaligned. Clean the tank, free the float, and reseat it until the sensor sees the level.
Is it worth replacing a thermal fuse?
Only if the unit is out of warranty and the body is sound. If plastic parts are brittle or the cost is high, a replacement brewer is safer.
Conclusion
You now have a full roadmap to bring a quiet brewer back to life. Start with simple checks, clean and descale, then move to part checks if needed. In most homes, these steps fix the problem fast and keep coffee rich and hot.
Put 15 minutes on the clock and try the first three steps today. If this guide helped, share it with a friend, subscribe for more kitchen fixes, or drop your own coffee maker not brewing fix story in the comments.