
Tighten the blade assembly, replace the gasket, and check for cracks or overfilling.
If a puddle forms under your blender, don’t panic. You can learn How to Fix Blender Jar Leak in minutes with simple tools and a calm approach. I’ve coached home cooks and repaired my own blenders for years, and this guide gives you clear steps, pro tips, and brand-specific notes so you can fix it right the first time.
What Causes a Blender Jar to Leak
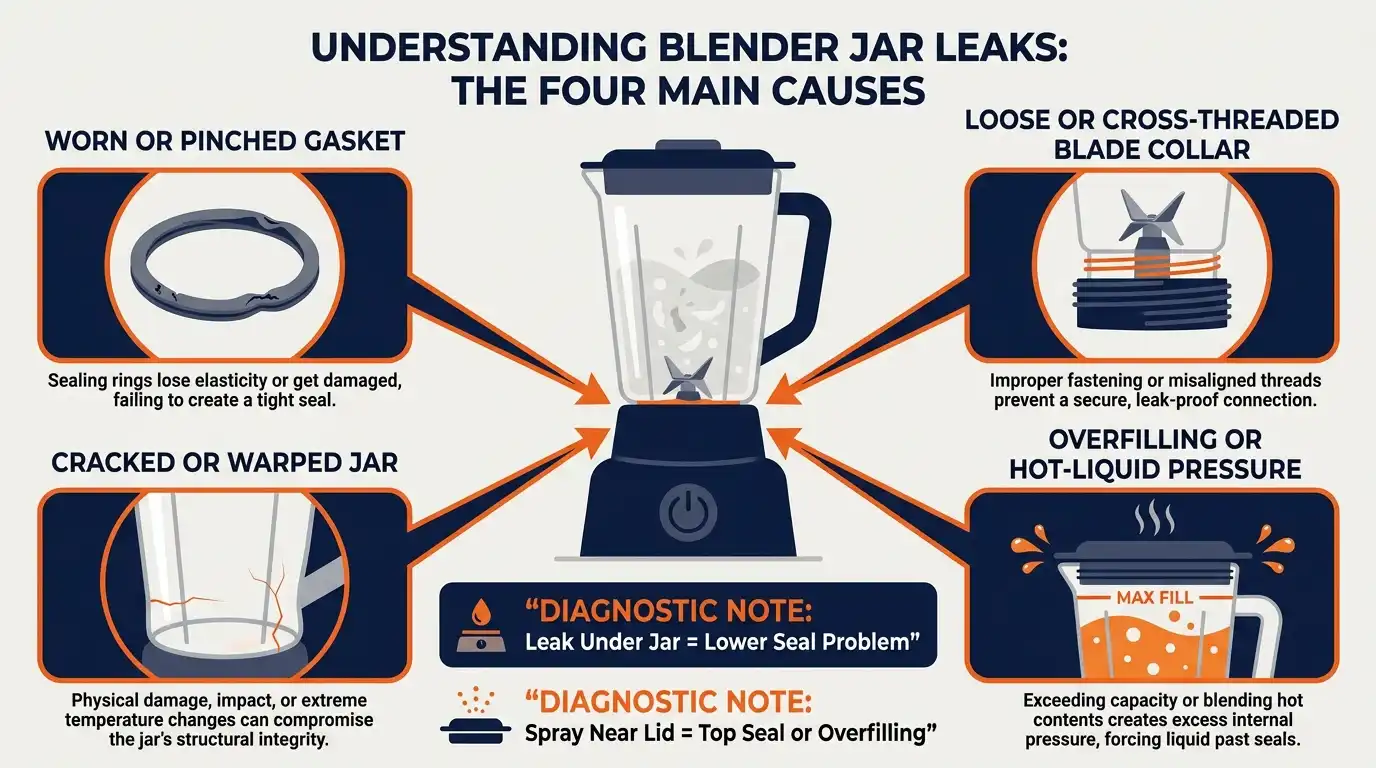
A leak almost always comes from one of four places: the gasket, the blade assembly, the jar, or the lid. Understanding where it starts will save you time and mess.
- Worn or pinched gasket. The soft ring under the blade dries out, cracks, or gets misaligned.
- Loose blade assembly or base collar. Threads loosen from vibration or from washing apart.
- Jar damage. Hairline cracks, warped plastic from heat, or chips near the base.
- Overfilling or hot liquids. Pressure pushes liquid out past the seal or lid.
A simple water test helps spot the source. Fill the jar halfway with cold water. Lock the lid. Let it sit on a dry towel for five minutes, then pulse for three seconds. Watch where drops appear. If water gathers under the jar, the issue is below the blade. If you see spray near the lid, the seal at the top is the problem.
Quick Diagnosis Checklist
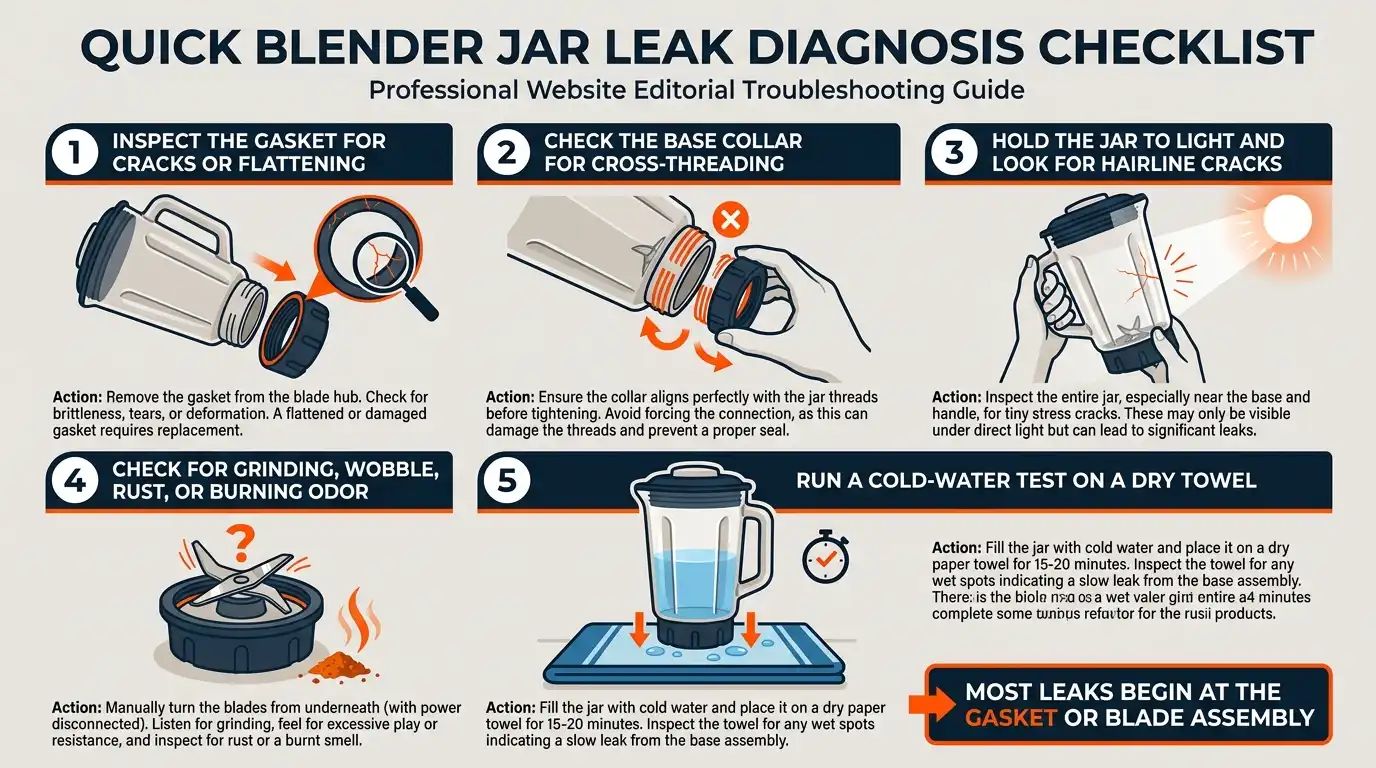
Use this fast scan before you buy parts or call support. It keeps the fix focused and cheap.
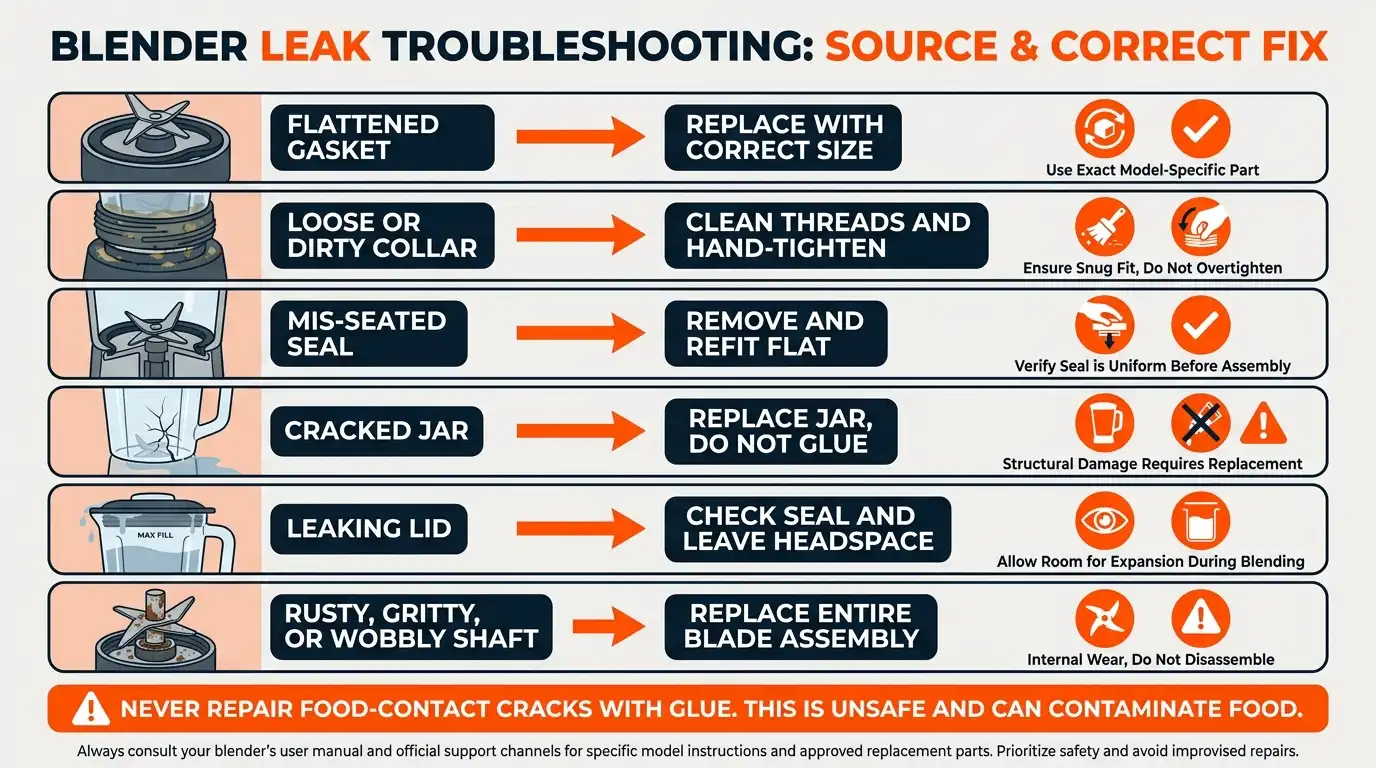
- Check the gasket. Is it flattened, cracked, or sticky? If so, replace it.
- Inspect the base collar. Does it cross-thread or stop short of snug? Clean and retighten.
- Look for jar cracks. Hold up to light. Rotate slowly. Hairline cracks show as bright lines.
- Smell for burning or hear grinding. That hints at a failing bearing or shaft seal.
- Test with water. Cold water shows leaks without sticky cleanup.
From my own bench time, most countertop blender leaks stop after a fresh gasket and a careful reassembly. It is the simplest fix and often costs only a few dollars.
Tools and Parts You May Need
You can fix most issues with basic tools. Keep it simple and safe.
- Replacement gasket or O-ring. Use the correct size for your brand and model.
- Food-safe silicone lubricant. A tiny dab helps threads and seals seat well.
- Soft brush and mild dish soap. Remove sticky residue and old grease.
- Microfiber towel. Dry parts fully so you can see fine cracks.
- Small screwdriver or spanner. Some blade hubs have retaining nuts.
Pro tip: Order two gaskets. Keep a spare in a drawer. It saves you from a smoothie emergency.
Step-by-Step: How to Fix Blender Jar Leak
Follow these steps for How to Fix Blender Jar Leak. Move slow. Keep parts in order. Take a quick phone photo before each step so reassembly is easy.
1) Unplug and Disassemble Safely
- Unplug the blender.
- Remove the jar from the base.
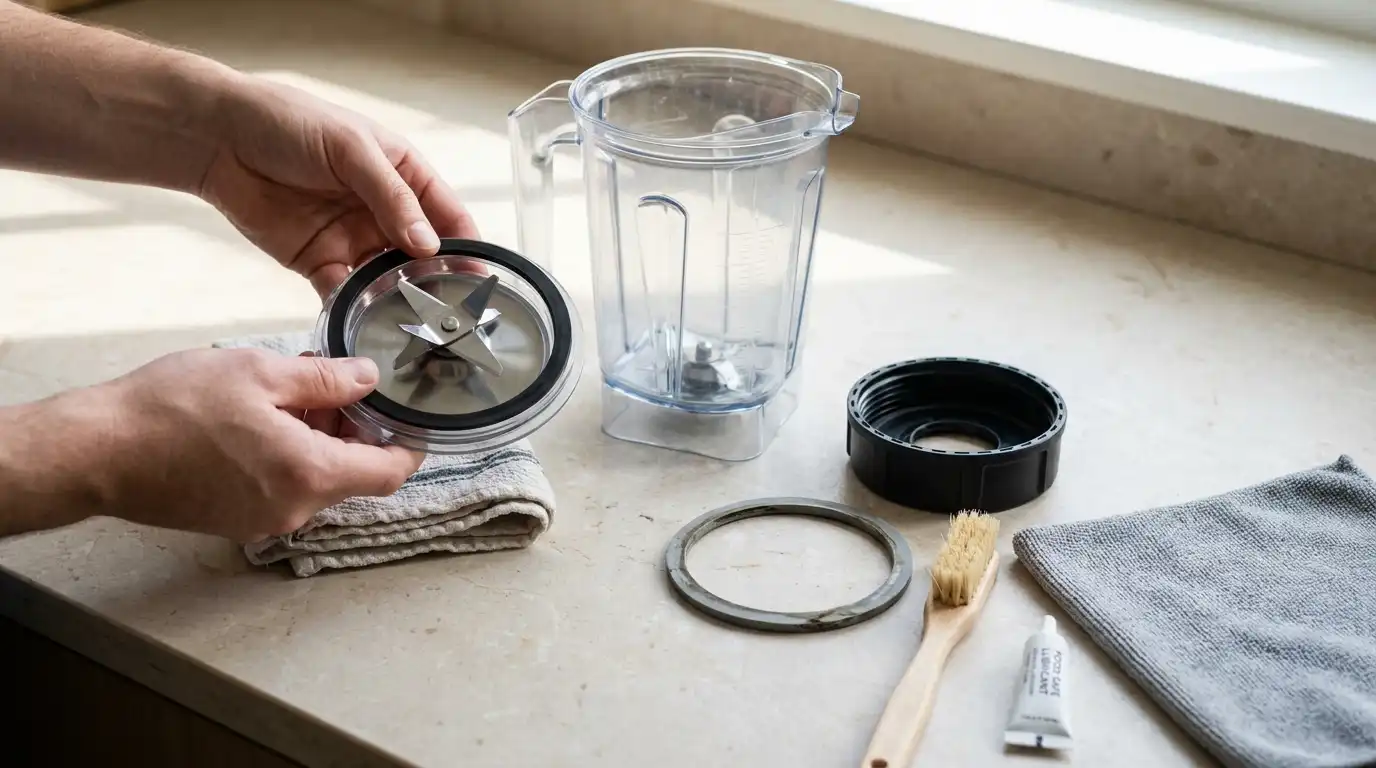
- Unscrew the base collar from the jar. Lift out the blade assembly and gasket.
Safety note: Blades are sharp. Hold the hub, not the edges.
2) Clean and Inspect Every Part
- Wash the jar, gasket, and collar with warm soapy water. Rinse well.
- Brush threads on the jar and collar. Remove all pulp and old grease.
- Dry fully. Check the gasket for flat spots, cracks, or tears.
- Inspect the jar base for chips and the blade hub for wobble or rust.
If the blade wobbles or the shaft seal is wet and sticky, plan for a full blade assembly replacement.
3) Replace the Gasket or O-Ring
- Match the new gasket to the old one for size and thickness.
- Seat the gasket flat on the blade assembly lip. Do not twist it.
- If your model seats the gasket inside the collar, press it evenly all around.
A mis-seated gasket is the number one cause of repeat leaks. Take an extra 10 seconds here.
4) Reassemble and Tighten by Hand
- Place the blade assembly into the jar.
- Thread the collar on by hand. Turn until snug. Do not over-tighten.
- Add a tiny dab of food-safe silicone to the collar threads if they feel dry.
Over-tightening can warp plastic or crush the gasket. Snug and even wins.
5) Water Test
- Fill the jar halfway with cold water.
- Set it on the base. Pulse once for two seconds.
- Check underneath and around the collar for drips.
- If dry, blend for 15 seconds. Recheck.
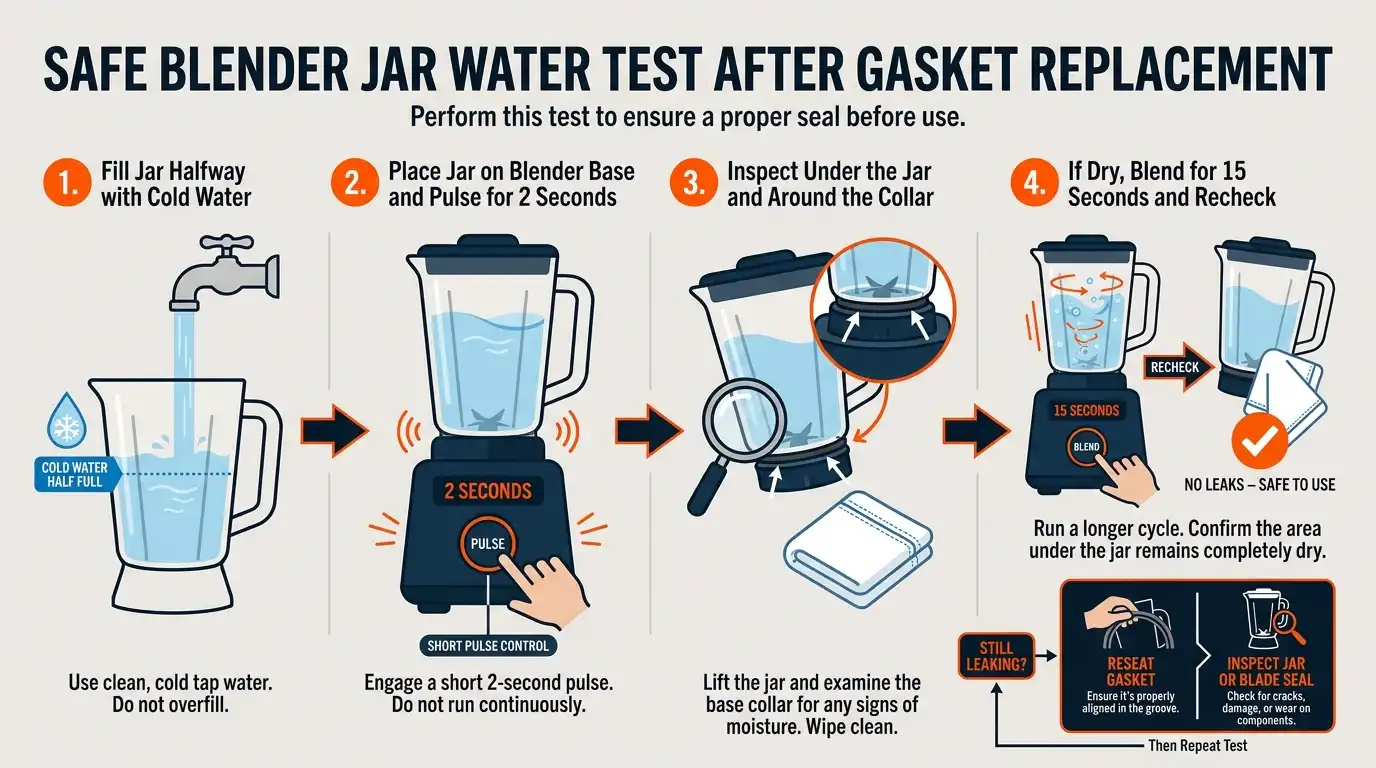
Still leaking? Remove, reseat the gasket, and try again. If it persists, the jar may be cracked or the blade assembly seal may be worn.
6) Fixing Leaks on Personal Blender Cups
- For twist-on cups, inspect the cup gasket inside the blade lid.
- Replace the gasket if flattened or stretched.
- Do not overfill. Leave headspace so pressure does not force leaks.
- Hand-tighten the blade lid evenly before blending.
7) If the Jar Is Cracked
- Small hairline cracks near the base often spread under load.
- Do not use glue inside food zones. It will not hold under heat and pressure.
- Replace the jar. It is a safety item and cheaper than a ruined motor.
8) If the Shaft Seal or Bearing Is Failing
- Signs include rusty stains, oil-like residue, gritty feel, or squeal.
- Replace the entire blade assembly. Most brands sell this as one unit.
- After replacement, run a 10-second water test and recheck.
Personal note: I once restored a six-year-old blender with a new blade assembly and gasket for less than a takeout dinner. It ran smooth and bone-dry after that simple swap.
Brand-Specific Notes You Should Know
Brands differ in how the jar, blade, and gasket fit. Check your manual if unsure.
- Vitamix. Many jars have fixed blades. If it leaks at the bottom, you usually replace the whole jar assembly.
- Ninja. Uses a separate gasket with a removable blade stack. Keep the ring clean and flat.
- NutriBullet and similar personal blenders. Gaskets sit in the blade lid. Never double up gaskets. Replace worn rings.
- Oster and Hamilton Beach. Classic models use a simple rubber gasket. Easy and cheap to replace.
- KitchenAid. Some models use a locking collar. Make sure it clicks and the ring is seated.
For How to Fix Blender Jar Leak on any brand, use the right part number. It prevents odd fit and early wear.
Preventive Care to Stop Future Leaks
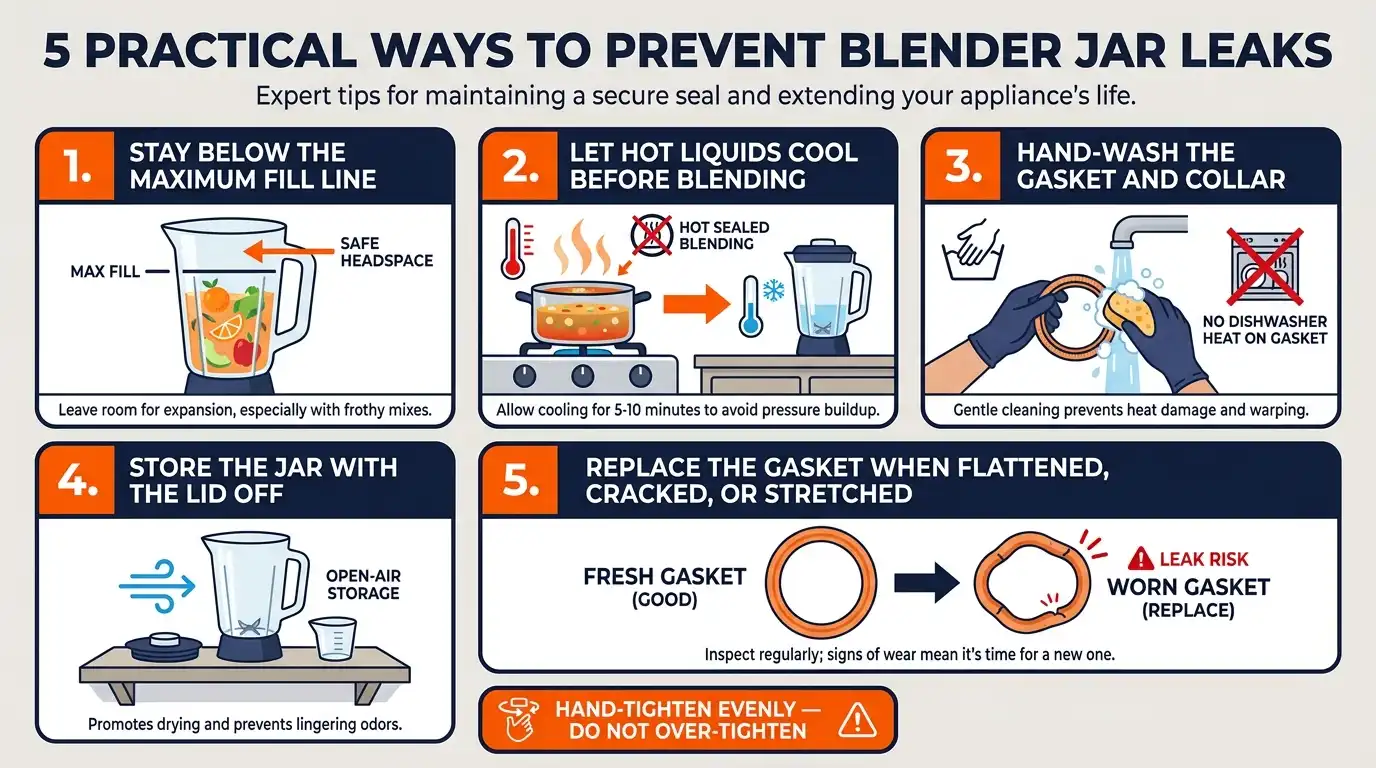
A little care keeps seals healthy and your counter dry.
- Do not overfill. Follow the max line. Leave room for expansion.
- Let hot liquids cool. Sudden heat can warp plastic and force leaks.
- Hand-wash the gasket and collar. High heat in dishwashers can harden seals.
- Store with the lid off. This prevents odor and keeps pressure off the gasket.
- Replace gaskets yearly if you blend often, or at the first sign of wear.
Think of the gasket like a sneaker sole. It grips and cushions. When it flattens, it is time to swap.
Safety, Warranty, and Parts Sourcing
Safety and trust matter when you fix kitchen gear. Keep these tips in mind.
- Always unplug before disassembling. Liquids and power do not mix.
- Use only food-safe lubricants near seals and threads.
- Check your warranty. Some brands cover jars and blades for a set period.
- Buy original parts when you can. Third-party gaskets may vary in size.
- Keep a repair log. Note dates and parts changed for easy tracking.
If you are unsure, call customer support with your model number. They can confirm the exact part and steps so you avoid guesswork.
Cost and When to Repair vs Replace
You can often fix a leak for a few dollars. But sometimes replacement is smarter.
- Gasket only. Low cost, fast fix, ideal for most leaks.
- Blade assembly. Moderate cost, solves leaks from shaft seals or bearings.
- Jar replacement. Higher cost, but the right call for cracks or heat damage.
- Whole blender upgrade. If the motor is weak, noisy, or older than a decade, consider a new unit with better seals and power.
When you weigh How to Fix Blender Jar Leak, compare part price, your time, and the blender’s age. If a repair gets you another two to three years of reliable service, it is usually worth it.
Frequently Asked Questions of How to Fix Blender Jar Leak
Why does my blender leak only with hot soup?
Heat expands air and thins liquids, which can push past a tired gasket. Let soup cool for a few minutes and make sure the gasket is fresh and seated flat.
Can I fix a cracked plastic jar with glue?
No. Glue does not hold under heat, pressure, and vibration. Replace the jar for a safe, lasting fix.
How tight should the blade assembly be?
Hand-tight and snug is enough. Over-tightening can warp the collar, crush the gasket, and cause fresh leaks.
How often should I replace the gasket?
Replace it at the first sign of flattening, cracks, or odors. For frequent use, a yearly swap keeps seals fresh.
Is dishwasher cleaning safe for the gasket?
It is better to hand-wash the gasket and collar. High heat and detergents can harden or shrink the seal over time.
Conclusion
You can fix most blender leaks with a calm check, a clean reassembly, and a new gasket. When needed, a fresh blade assembly or jar brings your machine back to safe, dry performance. With these steps for How to Fix Blender Jar Leak, you can save money, cut waste, and get back to smooth blends.
Ready to get hands-on? Grab a spare gasket, do the water test, and follow the steps above. If this helped, share your result, subscribe for more kitchen fix guides, or drop a question in the comments.