Most Keurigs stop dispensing water due to clogs, scale buildup, or airlocks.
If your Keurig coffee maker not dispensing water is driving you mad before your first cup, you’re in the right place. I’ve troubleshot dozens of machines at home and for friends, and I’ll show you exactly how to fix a Keurig coffee maker not dispensing water with simple steps, clear reasons, and real-world tips you can trust.

Quick checks before you dive in
Start with these fast checks. Many issues vanish with a minute of attention.
- Make sure the water reservoir is seated fully and filled.
- Remove any used pod, then try a water-only brew.
- Check for the Add Water, Descale, or Prime messages.
- Unplug for 60 seconds, then plug in and try again.
- Lift and close the handle firmly to reset the brew sensor.
If your Keurig coffee maker not dispensing water still won’t run, keep going. The next steps solve 90% of cases I see.

Why your Keurig stops dispensing water
Several common causes lead to a Keurig coffee maker not dispensing water. The good news: most are easy to fix at home.
- Mineral scale buildup Hard water leaves deposits that choke tiny water lines and sensors.
- Clogged needles Coffee oils and fine grinds block the entrance or exit needles.
- Airlock after refilling or moving Trapped air stops the pump from priming.
- Reservoir float or magnet stuck The tank’s water-level magnet can jam and confuse the sensor.
- Charcoal filter saturated or misplaced A swollen or old filter restricts flow.
- Weak pump or failing valve Less common, but possible in older units.
- Pod issues Damaged or overfilled pods can block flow.
When a keurig coffee maker not dispensing water shows no error lights, scale or an airlock is usually the culprit.

The step-by-step fix: from fastest to deeper repairs
Work through these in order. Stop if the machine starts flowing.
- Reseat and reset
- Remove and reseat the water reservoir with a firm press.
- Fill it at least halfway. Avoid distilled water; use filtered if possible.
- Unplug for 60 seconds. Plug back in. Open and close the handle. Run a water-only brew.
- Prime the pump
- With the reservoir full, lift the tank up slightly, then set it back down while the machine is idle. This nudges out trapped air.
- Start a water-only brew without a pod. If it sputters, repeat.
- Clear the spout path
- Remove the K-Cup holder and rinse it.
- Try a few short cycles of the smallest cup size to push through any small block.
If your keurig coffee maker not dispensing water persists after these, move to cleaning and descaling.
Descale to remove mineral buildup
Scale is the top reason a Keurig coffee maker not dispensing water keeps failing after a reset. Descaling dissolves the buildup in the heater and lines.
What you need
- Keurig descaling solution or white vinegar
- Fresh water
- A large mug and an empty sink
Steps
- Empty the reservoir and remove any charcoal filter.
- Fill the reservoir with descaling solution mixed as directed. If using vinegar, use a 1:1 mix with water.
- Run brew cycles without a pod until the Add Water light comes on. Use the largest cup size.
- Let the machine sit for 15–20 minutes to break down scale.
- Rinse the reservoir, then fill with fresh water.
- Run at least 3 full tanks of water-only brews to flush the system. Keep going until no smell remains.
Tip from experience: On badly scaled units, two descale rounds work better than one long run. If your keurig coffee maker not dispensing water improves a little, you’re on the right track—repeat once more.
Unclog the needles and pod holder safely
Clogged needles are tiny but mighty troublemakers. Always unplug first.
Entrance needle cleaning
- Remove the pod holder and funnel.
- Use the Keurig needle tool if you have it. If not, use a straightened paper clip.
- Gently insert into each hole of the entrance needle and move it up and down to clear debris.
- Rinse all parts under warm water and reassemble.
Exit needle cleaning
- Look under the K-Cup holder; the sharp exit needle can clog too.
- Use the tool or paper clip gently. Do not force it.
Run two water-only brews. If your keurig coffee maker not dispensing water now drips or flows again, you found the issue.
Fix reservoir, filter, and sensor issues
A sticky reservoir magnet can fool the machine into thinking the tank is empty.
- Clean the reservoir with warm, soapy water. Rinse well.
- Check the small magnet or float inside. If it sticks, soak and swish until it moves freely.
- Remove the charcoal filter during descaling. Replace it every 2 months or after 60 tank refills.
- Make sure the filter holder snaps in straight. A crooked holder can block water.
These quick fixes often solve a keurig coffee maker not dispensing water without deeper work.

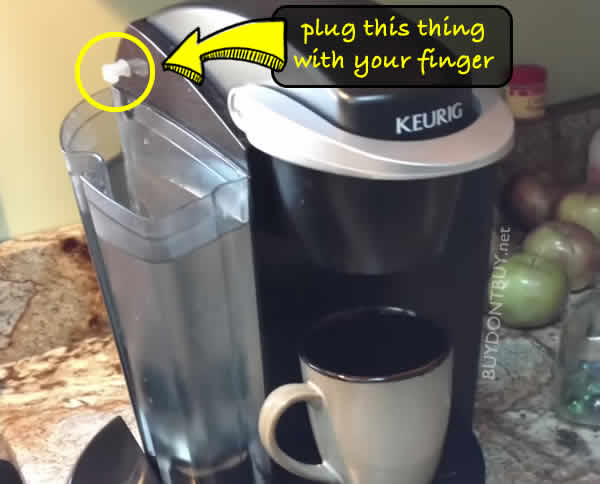
Clear airlocks and restore flow
Airlocks are common after moving the machine or letting it run dry.
Try this gentle method
- Fill the reservoir.
- Start a water-only brew with no pod.
- As it tries to brew, lift and reseat the reservoir once. This helps burp the pump.
- If still stuck, use a clean turkey baster to push a few ounces of water into the outlet in the reservoir base while the machine is idle. This primes the pump. Do not use excessive force.
From my own fixes, priming resolves about half the keurig coffee maker not dispensing water cases after a tank runs dry.
Advanced checks and when to repair or replace
If none of the above works, the issue may be internal.
What to look for
- The pump hums but no flow Strong sign of heavy scale or a weak pump.
- No sound at all Possible power board, switch, or thermal fuse issue.
- Leaks under the machine Likely a hose, O-ring, or valve problem.
Your options
- If under warranty, contact support before opening anything. Most Keurig models carry a limited one-year warranty.
- Out of warranty, a replacement pump is affordable, but DIY repairs carry risk and may not be worth it if the heater or control board is failing.
- Compare repair time and cost to a new model. If your keurig coffee maker not dispensing water is more than 4–5 years old and heavily scaled, replacement can be the wiser move.
Prevent the problem from coming back
A few habits keep your Keurig brewing strong.
Daily or weekly
- Empty and rinse the reservoir weekly.
- Run a water-only cycle after brewing flavored or oily coffees.
- Wipe the needle area and pod holder.
Monthly or by usage
- Descale every 3 months in soft water, every 1–2 months in hard water.
- Replace the charcoal filter every 2 months.
Smart water choices
- Use filtered water. Avoid distilled water because some sensors need minerals to detect water.
- If you see white film or scale, shorten the descale cycle interval.
These steps cut down 80% of keurig coffee maker not dispensing water complaints I see.
Model-specific pointers that matter
Different Keurig designs have small quirks.
- K-Mini and K-Mini Plus Single-cup fill systems are prone to airlocks. Prime by starting a brew, then carefully lifting and reseating the reservoir lid area as the pump starts.
- K-Slim Multi-needle system means more places to clog. Clean all needles, not just the top one.
- K-Duo and K-Duo Plus These have more complex water paths. Descale more often if you use the carafe side a lot.
- Keurig 2.0 Series Sensitive to pod alignment. Make sure the pod sits flat to avoid seal jams.
If your keurig coffee maker not dispensing water aligns with one of the quirks above, target that first.
Real-world troubleshooting wins and mistakes to avoid
From hands-on fixes at home and for friends, here’s what consistently works.
Wins
- Two gentle descales beat one harsh one. Patience clears more scale.
- Needle cleaning plus priming solves most no-flow issues fast.
- Reseating the reservoir during a brew can free a stubborn air bubble.
Mistakes to avoid
- Forcing tools into needles. This can bend or damage them.
- Using boiling water in the reservoir. It can warp plastic parts.
- Skipping the rinse cycles after descaling. Leftover solution tastes bad and can irritate.
Use these to shorten your path to a smooth, hot cup—and prevent another keurig coffee maker not dispensing water moment.
Frequently Asked Questions of keurig coffee maker not dispensing water
Why is my Keurig making noise but not dispensing water?
This often means an airlock or heavy scale is blocking the pump. Prime the pump and descale to restore flow.
Can I use vinegar to descale my Keurig?
Yes, a 1:1 mix of white vinegar and water works. Rinse well with several tanks of fresh water afterward.
How often should I descale to avoid no-water issues?
Descale every 2–3 months in soft water and every 1–2 months in hard water. Replace the charcoal filter every 2 months.
My Keurig says Add Water but the tank is full. What now?
Clean the reservoir and ensure the float or magnet moves freely. Reseat the tank so the sensor reads it correctly.
Is it safe to use a paper clip to clean the needles?
Yes, if you unplug first and use a gentle touch. Avoid forcing the clip to prevent damage.
Conclusion
A Keurig that won’t dispense water is usually fighting scale, a clog, or trapped air. With a careful reset, a solid descale, and a quick needle clean, most machines bounce back fast. If deeper parts fail, weigh repair against a replacement that fits your routine.
Take 15 minutes today to prime, clean, and descale. You’ll save time, money, and morning sanity. Want more easy coffee fixes and gear tips? Subscribe, bookmark this guide, or drop a comment with your model and symptoms—I’m happy to help.