
The best utensil drawer organization tips make daily cooking faster, cleaner, and far less frustrating.
A well-planned utensil drawer is more than a neat-looking space. It helps you find the right tool quickly, keeps handles and blades from getting damaged, and makes kitchen cleaning easier. These utensil drawer organization tips combine simple layouts, smart storage products, and real-life habits that work in small and large kitchens.
Why utensil drawer organization matters
A messy drawer wastes time in small but repeated ways. You may move three spatulas to find a peeler, dig under serving spoons, or grab a sharp tool without seeing it first. Over a week, these small delays can make cooking feel harder than it needs to be.
Good utensil drawer organization gives every item a clear home. It also prevents tools from rubbing together, which can scratch finishes, bend thin edges, or dull some blades. A tidy drawer is like a well-marked road: you know where to go, and you get there with less effort.
The best systems also support kitchen hygiene. Food crumbs, grease, and moisture can collect under loose utensils. Keeping tools separated and storing them only when dry makes the drawer easier to clean and helps reduce unwanted buildup.
These utensil drawer organization tips are especially helpful if you:
• Cook often and use many tools
• Share the kitchen with family members
• Have children who need safe access to basic utensils
• Own deep, narrow, or oddly shaped drawers
• Want to reduce clutter without buying a new cabinet
Start by emptying and sorting the drawer
Do not organize around a pile of unknown items. Remove everything from the drawer and place the utensils on a clean counter or table. Wipe the drawer with warm, soapy water, then let it dry fully before adding anything back.
This first step often reveals how much clutter you have. In one kitchen reset I helped with, the drawer held four can openers, several duplicate peelers, old takeout chopsticks, and tools that had not been used in years. The drawer was crowded, but only a small group of items supported daily cooking.
Sort utensils into simple groups:
• Keep and use often
• Keep and use sometimes
• Move to another storage area
• Donate or recycle if safe and suitable
• Repair or replace
Be honest about duplicates. Two wooden spoons may be useful, but seven may only create noise. Keep the version that feels best in your hand and performs the job well.
Check each item for cracks, rust, loose parts, and sharp damage. Wooden tools with deep splits, chipped plastic, or badly corroded metal may be difficult to clean safely. Food-contact tools should be smooth, intact, and easy to wash.
Measure the drawer before buying organizers

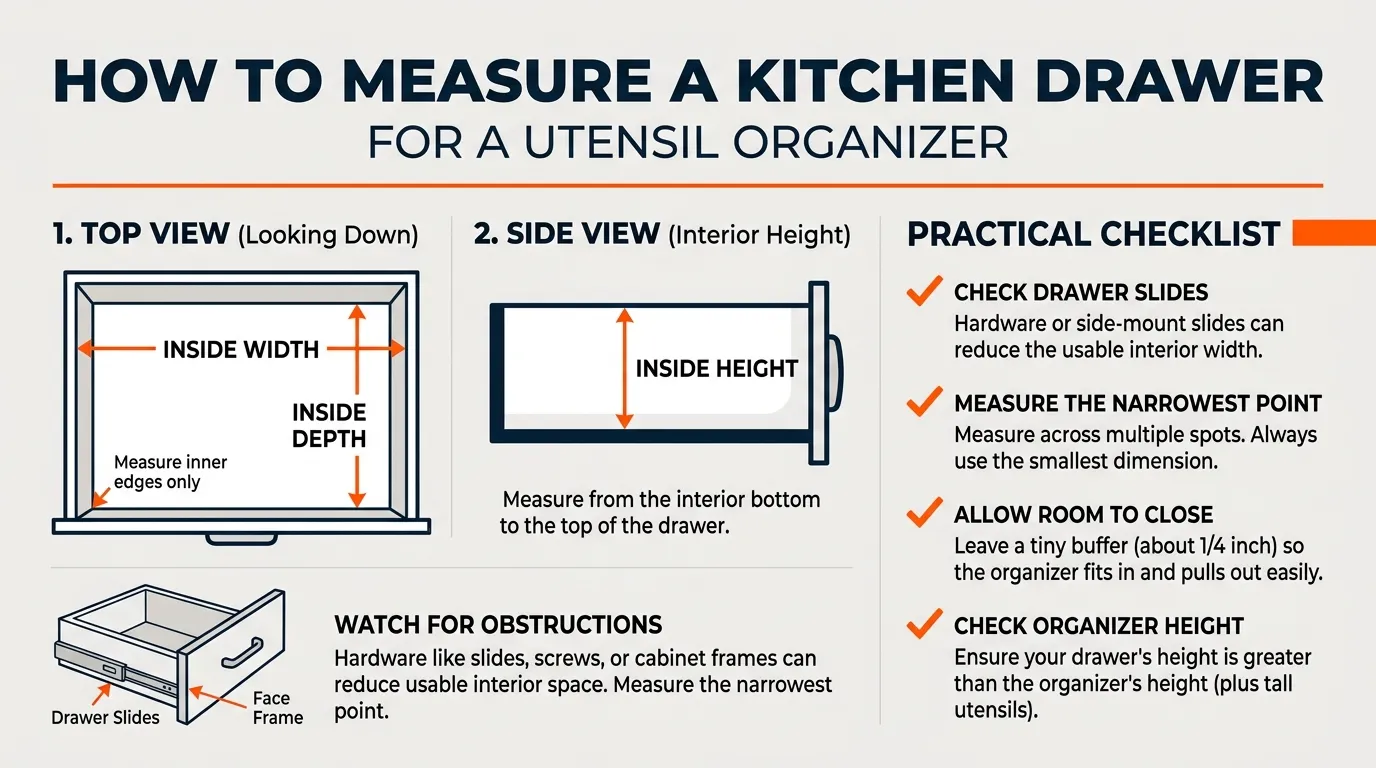
A common mistake is buying a tray first and measuring later. Drawer sizes vary, even within the same kitchen. Measure the inside width, depth, and height, not just the outside cabinet dimensions.
Open the drawer all the way and check for hinges, plumbing, drawer slides, or a frame that reduces usable space. Write down the smallest measurement at each point. This prevents a tray from sticking, shifting, or blocking the drawer from closing.
Look for these organizer features:
• Adjustable sections for changing utensil sizes
• Non-slip feet or a grippy base
• Rounded corners that are easy to wipe
• Low walls for shallow drawers
• Tall sections for deep drawers
• Moisture-resistant materials
Expandable trays can work well when the drawer has standard proportions. However, they may leave small gaps at the sides. Custom inserts usually provide a cleaner fit, but they cost more and may be less flexible if your needs change.
For renters or budget-conscious shoppers, a simple plastic tray with removable dividers can be a practical choice. The most expensive organizer is not always the best one. A good fit and useful layout matter more than a premium label.
Choose the right utensil drawer layout
There is no single perfect layout. The best arrangement depends on how you cook, which hand you use most, and where the drawer sits in relation to your main work area.
A useful starting plan is to place the most-used tools in the easiest-to-reach sections. Keep cooking tools together, eating utensils together, and specialty items in a less central area.
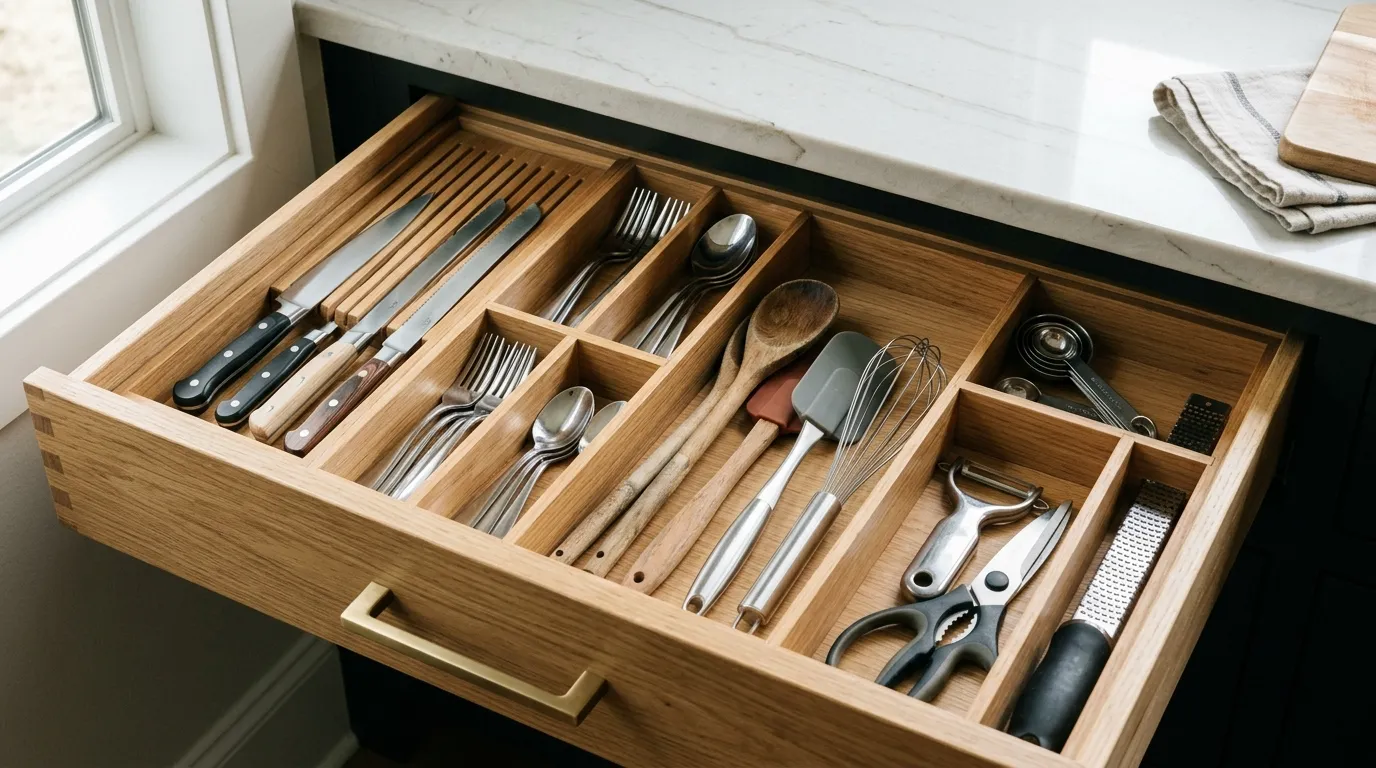
Try this basic layout:
• Forks, knives, and spoons in separate narrow sections
• Cooking spoons and spatulas in a wider section
• Measuring spoons and measuring cups near each other
• Peelers, zesters, and small prep tools in a compact section
• Serving tools in a deeper drawer or separate container
• Sharp tools in a protected section away from loose items
Think about the order of a normal meal. If you prep food first, place prep tools near the front or on the side closest to your counter. If you pack lunches often, keep small knives, measuring tools, and sandwich tools easy to reach.
One of my favorite utensil drawer organization tips is to arrange items by action rather than appearance. For example, put stirring tools together even if their colors do not match. A drawer should support your routine, not look like a store display.
Use compartments that match each utensil
Different tools need different amounts of space. A narrow slot works for chopsticks or teaspoons, but it may trap a wide spatula. A large open section gives flexibility, but it can allow small tools to become buried.
Use narrow compartments for:
• Teaspoons and tablespoons
• Dinner forks
• Butter knives
• Chopsticks
• Small spreaders
Use medium compartments for:
• Wooden spoons
• Tongs
• Peelers
• Whisks
• Small spatulas
Use wide or deep compartments for:
• Slotted turners
• Ladles
• Large serving spoons
• Pasta tools
• Meat thermometers with long handles
Avoid filling every section to its limit. Leave a little breathing room so you can remove one item without lifting several others. A drawer that is 80 percent full often works better than one packed to 100 percent.
If a tool does not fit well, do not force the layout. Move it to a deeper drawer, a countertop crock, or a wall rail. The goal of utensil drawer organization tips is better access, not keeping every tool in one drawer.
Organize sharp utensils safely
Sharp tools need extra care. Do not place loose paring knives, vegetable cutters, or small blades in a crowded tray where the cutting edge can face upward. Someone reaching into the drawer may get hurt.
Use a knife guard, a dedicated knife block insert, or a separate narrow section with protected slots. Store blades so the handle is easy to grasp and the cutting edge cannot catch on another tool.
Keep sharp tools away from children when possible. A child-safe latch may help with lower drawers, but it should not replace safe storage. Also, teach older children that a drawer is not a place to search with bare fingers.
A small knife organizer inside the drawer can be useful when counter space is limited. Choose one that keeps blades separated and can be removed for cleaning. Avoid loose foam or damaged inserts that shed material or hold moisture.
These utensil drawer organization tips also apply to kitchen scissors. Store scissors closed, with the handle facing outward, and clean them according to the manufacturer’s instructions.
Keep everyday utensils separate from specialty tools
Daily tools should not compete with tools used once a month. If a turkey baster, melon baller, or cake decorator takes up the best space, everyday cooking becomes less convenient.
Create a “daily use” zone for items such as:
• Chef’s spoons
• Tongs
• Spatulas
• Measuring spoons
• Peelers
• Can openers
Place seasonal and specialty tools in a second drawer, pantry bin, or labeled container. This simple separation can make a small kitchen feel much larger.
You can also use a frequency test. Ask, “Have I used this in the last 30 days?” If not, ask whether the item has a clear seasonal purpose. This does not mean you must remove sentimental or occasional tools. It simply helps you protect valuable drawer space.
For households that cook different foods, create zones based on real habits. A baker may need measuring tools at the front, while a pasta lover may want tongs and a pasta server close by. Personal routines should guide the system.
Make small drawers work harder
Small drawers need vertical thinking and careful limits. Start by removing bulky items that belong elsewhere. Large whisks, rolling pins, and long-handled utensils often work better in a crock, pegboard, or deep drawer.
Choose a low-profile tray for flat utensils and use a second narrow tray for small tools. If the drawer is very shallow, avoid stacking items. Stacked utensils may look compact, but they slow access and hide what you need.
Consider these small-space ideas:
• Use a two-tier sliding tray if the drawer is tall enough
• Add adjustable dividers to stop tools from shifting
• Store measuring spoons on a small ring if that suits your routine
• Move duplicate tools to a backup container
• Keep only the most-used items in the top drawer
One of the most effective utensil drawer organization tips is reducing the number of items before adding storage. An organizer cannot solve an overcrowding problem if the drawer holds more tools than it can comfortably support.
Keep the drawer clean and easy to maintain
Organization lasts when cleaning is simple. Choose trays that lift out easily and have smooth surfaces. Avoid designs with deep cracks where crumbs and grease can hide.
Wash utensils according to their material and care instructions. Stainless steel is often durable, while wood may need careful hand washing and thorough drying. Some plastics can warp in high heat, and not every tool is dishwasher safe.
Use this simple maintenance routine:
- Empty the drawer every few weeks.
- Shake out crumbs or vacuum them with a clean attachment.
- Wipe the tray with warm, soapy water.
- Dry the tray and utensils fully.
- Return each item to its assigned section.
- Remove tools that no longer work well.
Food-safety guidance consistently emphasizes cleaning surfaces and allowing items to dry properly. A dry drawer matters because trapped moisture can create odors and encourage mold on suitable materials. If you notice rust, sticky residue, or a musty smell, clean the drawer promptly and inspect the affected tools.
Do not line the drawer with fabric or absorbent material unless it can be washed and dried often. These liners may feel soft, but they can hold crumbs and moisture.
Common utensil drawer organization mistakes
Even a good plan can fail if the layout is too complicated. The best utensil drawer organization tips are easy to follow when you are tired, rushed, or cooking for guests.
Avoid these common mistakes:
• Using a tray that leaves no room for fingers
• Mixing sharp tools with loose utensils
• Keeping every duplicate item
• Storing wet tools in the drawer
• Placing daily tools at the back
• Using too many tiny compartments
• Ignoring the drawer’s height
• Organizing by color instead of use
• Buying organizers without measuring
A system should also work for everyone in the home. If only one person understands the layout, the drawer will quickly become messy again. Use clear zones rather than rules that are hard to remember.
After organizing, test the drawer for one week. Notice which tools you reach for, which sections feel crowded, and what keeps landing in the wrong place. That feedback is more useful than trying to create a perfect arrangement on the first attempt.
A simple reset plan for busy households
You do not need to organize the whole kitchen in one afternoon. A short reset can still create visible progress.
Try this 20-minute plan:
- Remove everything from one utensil drawer.
- Clean and dry the empty drawer.
- Keep only tools used often or truly needed.
- Group the remaining items by purpose.
- Measure the drawer if you need a tray.
- Place daily tools near the front.
- Test the drawer several times.
- Adjust the layout after a week.
Invite family members to help decide where shared tools belong. Children can sort safe items, while adults handle knives and damaged tools. Shared ownership makes the system easier to maintain.
If you are helping someone else organize, ask about their cooking habits first. A layout that works for a professional baker may not suit someone who mostly prepares quick breakfasts. Practical organization starts with listening.
Frequently Asked Questions About Utensil Drawer Organization Tips
What is the best way to organize a utensil drawer?
Group tools by purpose and frequency of use. Keep everyday utensils near the front, use compartments that match each tool, and place sharp items in a protected section.
How do I organize a small utensil drawer?
Remove duplicates, use a low-profile tray, and keep only daily tools in the drawer. Move bulky or occasional utensils to a deeper drawer, crock, pantry bin, or wall storage.
Should kitchen utensils be stored upright or flat?
Flat storage works well for shallow drawers and common utensils. Upright storage can suit deep drawers or countertop containers, especially for long tools such as ladles and large spatulas.
How often should I clean my utensil drawer?
Clean it whenever you see crumbs, grease, moisture, or dust. For many homes, a deeper clean every few weeks or once a month is a practical routine.
How should I store knives in a utensil drawer?
Use a knife guard or a dedicated drawer insert that separates blades. Keep handles easy to reach, prevent cutting edges from facing upward, and store knives away from loose tools.
Are expandable utensil trays worth buying?
They can be useful when the drawer has a common size and you need flexible sections. Measure carefully first, because some expandable trays may leave gaps or shift if they do not fit tightly.
How many utensils should go in one drawer?
There is no fixed number because drawer sizes and cooking habits differ. Leave enough space to lift each tool without moving a pile, and remove items that are rarely used or duplicated.
Conclusion
A tidy utensil drawer starts with fewer items, clear zones, and a layout built around your real cooking habits. Measure before buying an organizer, protect sharp tools, keep utensils dry, and leave enough space for easy access.
The most useful utensil drawer organization tips are simple enough to maintain every day. Start with one drawer today, test the arrangement for a week, and make small changes until the system feels natural. Share your favorite kitchen storage ideas or explore more practical home organization guides for your next project.